Don’t let the rain stop you and your little ones experiencing Nature and having fun with it. Here are some creative ideas that you can do indoors:
Build a Terrarium
A terrarium is a completely self-supporting ecosystem. The plant life replenishes the air with oxygen, light shining through provides the light and power source, and water comes from the moisture in the soil. As the dead leaves fall off, they decompose providing food for the soil.

What you need:
- A clear glass container with a wide neck to allow your hand in (Mason Jar)
- Small stones or gravel
- Activated charcoal (get from pet store)
- Potting soil
- Small sponge
- Piece of screen, mesh, or cheesecloth
- Plants or moss
Directions:
- Select your plants. They should be small, like shade, and not grow too fast or too tall.
- Put gravel on terrarium floor.
- Sprinkle a small amount of activated charcoal on top.
- Cover with a piece of screen with a slit cut in the middle.
- Slice the sponge to one third inch wide and stick it in like a candle between the slit in the screen and anchor it in the gravel. The sponge will bring moisture up to the plant roots.
- Cover with potting soil.
- Gently make small holes and place plants in them, packing the soil loosely around them.
- Spritz your plants with water and cover. Add small figures.
Your terrarium may look a little limp for a few days but will get used to its new environment in no time.
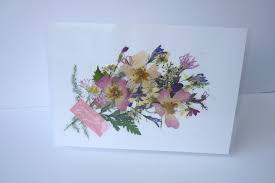
Pressed Flowers
Materials needed:
· Flowers and leaves
· Clear contact paper
· Card
· Scissors
· Ribbon (optional)
What to do:
- Gather flowers and leaves that you’ll use for your placemats.
- Remove the flower blossoms and leaves from their stems and lay them on the Card . You may want to practice arranging the flowers on the paper once you put the flowers on the contact paper, you won’t be able to move them!
- Cut two pieces of card, approximately 9″ x 12″.
- Peel the backing off one piece of contact paper and lay it sticky-side up on the table.
- Arrange the flowers and leaves on the sticky side of the contact paper.
- Press the flowers so they lay flat on the contact paper. If you’d like to add more decoration, press ribbon to the edges for a border.
- Peel the backing off the remaining piece of contact paper. Carefully cover your placemat (sticky-side down) with the contact paper. Do this step slowly and carefully to avoid getting wrinkles in the placemat.
- Flatten your placemat once more to smooth out any wrinkles or air bubbles, and then use the scissors to trim any uneven edges.
Enjoy flowers all year round!
Biodegradable Toilet Paper Roll Seedling Pots

With these easy to make biodegradable pots there’s no need to go out and buy expensive peat pots. These are the perfect size for normal size seedlings. Big seeds like sunflower seeds are not suitable for a starter pot this size but that should be a given. This pot is perfect for starting seeds and can be planted directly into a bigger container or into ground soil. They cost almost nothing and are a great way to re-use something you would have thrown away anyway.
1. Fold the roll in half one way. Then, fold it in half the other way, making sure the creases from the last fold line up and you have a square!
2. Cut the roll into two parts.
3. Cut Out the Flaps.
4. Crease the Flaps.
5. Fold the Flaps Cardboard Box Style.
6. Plant!
Stay tuned for next weeks Fun with Nature Ideas!